How to get rid of the panels in Ubuntu

In my last post about netbooks I said I’ll make it so some kind of series of guides, so here the second part 🙂

One of the biggest problems when using a nebook is that every pixel matters. the screen is so small that you really need save as much screen as you can.

For that reason i found it very comfortable to replace the panels with a dock such as Avant Window Navigator (and not like Docky that I don’t like at all!).
when I looked on web (or more exact, on Google) I wasn’t able to find anything useful about it, so i went to our chat (#ubuntu-il) and got the answer right away (thanks Avishay! you’re the man!) :

WARNING: make sure you have a menu somewhere else, since after that step you can’t use Alt+F1 or Alt+F2.

First open the terminal (for beginners: Applications > Accessories > Terminal),
now enter the command:

gconf-editor /desktop/gnome/session

double click the option “required_components_list” and remove from the list the “panel” value.

logout and login back,
that’s it! 🙂

Dor 🙂

Ubuntu Facebook badge!‎

Hey guys,

If you use Facebook and support Ubuntu, you may want to show it with an awesome badge I recently found on the www!

I suggest “wearing” it, sharing it, spreading it any way possible…

kids, please try this at home!!!

Dor 🙂

PS – to those who are afraid for their data, please notice that this application asks for all facebook information.

פיפוש על אובונטו? עובד!

שלום לכולם,

בזמנו הרצתי את פיפוש על המחשב נייד הקודם שלי, שלמי שלא זוכר – לא היה לי בו סאונד, פיפוש בלי סאונד זה לא שווה ממש ולכן השארתי את הדיסקים (המקוריים!) בצד.

לא מזמן קניתי מחשב חדש ולאחר שהמשחק הוזכר כמה פעמים בצ’אט, עלה בי שוב החשק הנוסטלגי לשחק.
אז איך גורמים לזה לרוץ..?

פיפוש!

עטיפת המשחק פיפוש (מתוך וויקיפדיה)

שימו־לב! המדריך הוא לבעלי דיסקים של פיפוש, יכול להיות שזה יעבוד גם על הגרסה להורדה מהאינטרנט, אבל אני לא מבטיח כלום.

קודם־כל נלך למחשב ליד עם הכונן דיסקים (או במחשב הזה, אם יש לכם כונן דיסקים) ונהפוך את הדיסקים לקובצי ISO בעזרת הפקודה הבאה (הכניסו את הדיסק הראשון לכונן התקליטורים והריצו את הפקודה):

dd if=/dev/cdrom of=piposh1-1.iso bs=64k

וגם את החלק השני… (ולא לשכוח להחליף את הדיסק לחלק השני…)

dd if=/dev/cdrom of=piposh1-2.iso bs=64k

את שני קובצי ה־ISO נעביר למחשב עליו אנו רוצים להריץ המשחק (SSH, דיסק און קי, בלוטות’ וכל דרך העברת קבצים שתמצאו לנכון).

כעת נעגון את הקבצים:
אני יצרתי תיקייה בספריית הבית בשם VD (שזה VirtualDrive) עבור כל ה־ISO שאני מתכוון לעגון:

mkdir ~/VD
mkdir ~/VD/piposh1-1
mkdir ~/VD/piposh1-2
sudo mount -o loop ~/VD/piposh1-1.iso ~/VD/piposh1-1/
sudo mount -o loop ~/VD/piposh1-2.iso ~/VD/piposh1-2/

מה שעשינו זה קודם יצרנו תיקייה עבור ה־ISO בשם VD, אתם צריכים להעתיק לשם את קובצי המשחק (ה־ISO) ואז לעגון את הדיסקים לתיקייות.

אם אין לכם עדיין Wine מותקן, זה הזמן להתקין (דרך מרכז התכנות או עם הפקודה sudo apt-get install wine).
נווטו לתפריט Applications > Wine > Configure Wine.
בלשונית Applications בחרו ב־Windows Version: Windows 98
הכנסו אל הלשונית Drives ולחצו על הכפתור Add > ok.
ב־Path הכניסו את המיקום של הדיסק הראשון (אצלי זה: /home/dor/VD/piposh1-1/), לחצו על Show Advanced ובאפשרות Type בחרו באפשרות CD-ROM.
חזרו על אותה הפעולה, רק עם piposh1-2, כדי לטעון כבר עכשיו את התקליטור השני (שלא תתקעו עם זה אח”כ).
לחצו על הכפתור OK בתחתית כדי לשמור את השינויים שעשינו.

סיימנו עם החלק של ההגדרות (מסובך נכון? תאשימו את Microsoft)! עכשיו להתקנה עצמה 🙂

הכנסו אל piposh1-1, הוא אמור להופיע לכם בתפריט בצד ב־Nautilus (סייר הקבצים), אם לא, פשוט כנסו אל VD/piposh1-1. תמצאו שם את הקובץ setup.exe, הפעילו אותו ועקבו אחר ההוראות (בעיקר Next Next Next).

בתום ההתקנה נווטו בתפריט אל Applications > Wine > C: Drive. משם כנסו אל Program Files > piposh > Piposh.exe להפעלת המשחק.

מסתבר שבלינוקס המשחק פועל אפילו יותר טוב מאשר בחלונות 😉
תהנו!

נ”ב – השתדלתי לכתוב את המדריך שיתאים גם למשתמשים מתחילים… אם יש לכם שאלות אל תחששו לשאול, אני לא נושך בדר”כ.

דור 🙂

Making Xchat more comfortable for netbooks

Hey there!

Not too long ago I bought  a brand new awesome Dell netbook. must say I like it very much and that it runs slickly with Ubuntu 10.04 (Dell Inpiron mini 1012 if you’re curious).

BUT – (and of course there’s one), I had to deal with the new small size. the keyboard is really comfortable though, but the screen is REAL small. on this post I’ll focus on making Xchat IRC client best sized for netbooks.

First let’s begin with the menubar, press F9 to make it disappear. even though it’s only about half centimeter, it’s 2 chat lines that we want to use. the menu is very useful but it’d not used commonly, so we’ll just keep it hid. if you need it back you can just right click on any place inside the chat itself or use the F9 key stroke again to show it up.

Now I’ll focus on is the channel switcher. the channel switcher at default comes on tree mode in the left side, for that reason it takes a big part of the screen that’s not really used well. so.. let’s fix it up!
go to Settings > Preferences menu, and find your path to the Channel Switcher category. let’s change the type of the switcher from “Tree” to “Tabs” and then make it to show on the “Top” instead of “Left”. that way it will take way less place, it will take about the same height we freed by hiding the menus 🙂
we can manage to save a little bit more place by unchecking “Open an extra tab for server messages” option.

EDIT: thanks to Gord Allot for his comment, you should read it!

A little bonus for active Ubuntu users (!!!):
There are many channels that starts with “ubuntu” that’s i’m sitting in, I figured out it takes a lot of place that is quite unnecessary, so I’ve decided to write a little script for Xchat, making the word “ubuntu” on tabs to be replaced with “U” for saving that place too. it doesn’t mean you can join Ubuntu channels using just “U” instead of “ubuntu”, but it will save you that place on the channels switcher.
you may download my script from here (licensed under GPL) and save it under ~/.xchat folder to make it load on Xchat startup.

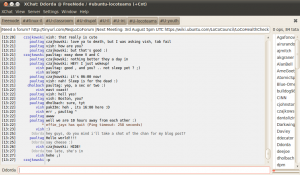
Xchat tweaked

I believe I’ll make some more guides in this subject, I believe i should spread the experience I have, that’s what open source is all open, right? ;)

Dor 🙂