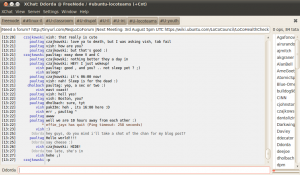
Making Xchat more comfortable for netbooks

Hey there!

Not too long ago I bought  a brand new awesome Dell netbook. must say I like it very much and that it runs slickly with Ubuntu 10.04 (Dell Inpiron mini 1012 if you’re curious).

BUT – (and of course there’s one), I had to deal with the new small size. the keyboard is really comfortable though, but the screen is REAL small. on this post I’ll focus on making Xchat IRC client best sized for netbooks.

First let’s begin with the menubar, press F9 to make it disappear. even though it’s only about half centimeter, it’s 2 chat lines that we want to use. the menu is very useful but it’d not used commonly, so we’ll just keep it hid. if you need it back you can just right click on any place inside the chat itself or use the F9 key stroke again to show it up.

Now I’ll focus on is the channel switcher. the channel switcher at default comes on tree mode in the left side, for that reason it takes a big part of the screen that’s not really used well. so.. let’s fix it up!
go to Settings > Preferences menu, and find your path to the Channel Switcher category. let’s change the type of the switcher from “Tree” to “Tabs” and then make it to show on the “Top” instead of “Left”. that way it will take way less place, it will take about the same height we freed by hiding the menus 🙂
we can manage to save a little bit more place by unchecking “Open an extra tab for server messages” option.

EDIT: thanks to Gord Allot for his comment, you should read it!

A little bonus for active Ubuntu users (!!!):
There are many channels that starts with “ubuntu” that’s i’m sitting in, I figured out it takes a lot of place that is quite unnecessary, so I’ve decided to write a little script for Xchat, making the word “ubuntu” on tabs to be replaced with “U” for saving that place too. it doesn’t mean you can join Ubuntu channels using just “U” instead of “ubuntu”, but it will save you that place on the channels switcher.
you may download my script from here (licensed under GPL) and save it under ~/.xchat folder to make it load on Xchat startup.

Xchat tweaked

I believe I’ll make some more guides in this subject, I believe i should spread the experience I have, that’s what open source is all open, right? ;)

Dor 🙂

איך לשנות קידוד לכתוביות סרטים בלינוקס בלי מסוף

שלום לכולם,

נשאלת השאלה  האם ישנה אפשרות לשנות קידוד לכתוביות סרטים – בלי לגעת במסוף? (או יותר נכון נשאלה השאלה בצ’אט, מוזמנים ;))

התשובה היא חד וחלק – כן! וזה אפילו יותר פשוט ממה שנראה לכם!

בואו נתחיל מנקודת ההתחלה: הבעיה
הבעיה שלנו היא שמיקרוסופט לא אוהבים לעבוד לפי סטנדרטים, בקידודי טקסט הסטנדרט הוא UTF8 ובחלונות יש כל מני סוגי קידודים נפוצים יותר ונפוצים פחות. כאשר משתמש לינוקס פותח קובצי טקסט בעברית, בין היתר כתוביות לסרטים, הטקסט מוצג בג’יבריש מכיוון והתכנה מנסה לקרוא את הטקסט בקידוד UTF8 כאשר הטקסט בקידוד שונה.

הפיתרון
יש כלים רבים טקסטואליים לפתור את הבעיה, פיתרון כזה קל למצוא בגוגל, ואפילו תומר כהן פרסם פעם מדריך בנושא, אבל אני אתרכז במשתמש הקצה שרוצה לעשות את זה בצורה הגרפית. כדי לפתור את בעיית הקידודים נשתמש בתכנה הנפוצה Gedit (שמגיעה כבררת־מחדל בהרבה הפצות לינוקס).

  1. הכנסו אל Gedit (ב־Gnome: ‏Application > Accessories > gedit)
  2. נווטו בתפריט אל File > Open או השתמשו בקיצור המקשים: Ctrl + O.
  3. בחלון שנפתח תוכלו למצוא בחלק התחתון רשימת־גלילה בשם Character Encoding. ליחצו עליו וגללו למטה לאפשרות Add or Remove…‎ (ראו תמונה).
  4. כעת ייפתח לכם חלון עם רשימת קידודים מסודרת לפי שפות. גללו ברשימה עד לעברית (Hebrew) והוסיפו את שלושת הקידודים הללו (IBM862, WINDOWS-1255, ISO-8859-8) באמצעות הכפתור Add. ודאו שהקידודים נוספו בכך שהם יופיעו ברשימה בצד ימין (ראו תמונה)
  5. מעכשיו כל פעם שתפתחו קובץ טקסט (כמו למשל כתוביות) עם Gedit, הזיהוי האוטומטי של התכנה ידע לפענח איזה קידוד הקובץ ולהציג אותו בעברית ולא בג’יבריש. מכאן הדרך להפוך אותו ל־UTF8 פשוטה.
    פתחו את הקובץ שאתם מעוניינים לתקן לו את הקידוד, ליחצןו על כפתור השמירה ושנו את ה־Character Encoding ל־UTF8. הקובץ ששמרתם יהיה בקידוד מתוקן, מזל־טוב!

זהו!

תהנו,
דור 🙂

תלת מימד “אמיתי” באמצעות compiz

שלום לכולם,

לפני מספר ימים יצא לנו לדבר בחדר הצ’אט ‎#linux-il על מימוש האפשרות של תלת מימד “אמיתי” במחשב (כזה עם משקפיים),  זה לא נשמע מסובך מדי, והתחלתי לבדוק אפשרות ליצירת gtk theme כזה. לאחר זמן־מה אלעד (el.il, elad661) מצא תוסף כזה ל־compiz, אז ניסיתי אותו, הרי לפניכם התוצאה:

למעשה האפקט פועל על כל דבר כמעט שמוצג על המסך, כולל סרטונים, פלאש, תיקיות, אייקונים וכו’.

גם אני רוצה!
כדי להתקין את האפקט על אובונטו/דביאן ניתן להוריד את החבילת ‎deb שיצרתי ל־32 bit מכאן או ל־64 bit מכאן (תודה ל־shpongle!). עבור שאר ההפצות ניתן להוריד את קוד המקור מכאן (ולראות כיצד להתקין במדריך שאלעד כתב בנושא).

לאחר ההתקנה הכנסו אל ccsm (‏Compiz Config Settings Manager) וחפשו Anaglyph (נמצא תחת Effects). לחצו על האפקט כדי להכנס להגדרות שלו. בשורה Initiate screen בחרו קיצור מקשים להפעלה/הפסקת האפקט ולסיום סמנו את התבה Enable Anaglyph.

מגניב, הא? 🙂

אזהרה: אלעד ציין מספר פעמים ששימוש ממושך באפקט עלול לגרום לגרום לפגיעה בתפיסת העומק, אז תשתמשו כדי להלהיב את החברים, אבל אל תהפכו את זה להרגל.

דבר נוסף – אמנם האפקט משפיע גם על סרטונים, אבל אל תצפו לראות רמת תלת מימד של קולנוע, כי זה אפקט אוטומטי, לא ישבו וערכו את זה.

דור 🙂

How to install Dropbox without having a GUI

Hey there,

Yesterday I tried to find a way how to install Dropbox when no GUI available, which means on my Ubuntu server machine (just an old computer sitting in my small “mamad“mamad). I wanted to use it for some kind of a little cloud between the computers of my family so i can choose what to share with who, and also as a backup system (online).

I must say it wasn’t so easy to find how to do it, but in the end i found the answer on a very surprising place: the Dropbox wiki (surprised, huh?).

the page on the wiki looks very complicated, which is not true – so how to do it?

First make sure you are registered, I believe you won’t like to use your own account on a different machine.
after you’ve registered, enter the machine (SSH would be best option) and do the following steps:

1. Make sure you’re on your home directory by running the command:
$ cd

2. Now download the Linux tarball
$ wget -O dropbox.tar.gz http://www.dropbox.com/download/?plat=lnx.x86
or for 64bit users:
$ wget -O dropbox.tar.gz http://www.dropbox.com/download/?plat=lnx.x86_64

3. now extract the files:
$ tar -zxof dropbox.tar.gz

4. run the script in background:
$ .dropbox-dist/dropboxd &
you’ll get a link. copy it and open it in your browser and then login with the email address and password you have registered in the beginning.
after you’ve done so – the script will stop and Dropbox will run logged-in.
the Dropbox folder located on ~/Dropbox as usual.

5. to make sure Dropbox will load on startup run the command:
$ dropbox autostart
you can find the whole commands list using dropbox –help or man dropbox

please note that while I did it on Ubuntu server, it might work on any distribution.

Hope this small guide will help someone…
Ddorda 🙂